To do this, you need to create a hero -- an imaginary character who serves as your "connection" with the Gamemaster's setting and the other players' heroes. Your hero starts out as a collection of numbers and descriptive terms; from then on it's up to you to make that hero come alive through roleplaying.
By reacting as you think your hero would react and interacting with the other characters using your hero's voice and opinions, you're doing your job as a player.
Four distinct hero professions are available in these fast-play rules.
Pick a profession that fits the kind of hero you want to play, then select
one of the corresponding fast-play character templates (Combat
Spec, Diplomat, Free
Agent, or Tech Op). Note that there
are two different examples of each profession, giving you distinct choices for
the kind of hero to play. Any of the templates can be used with the fast-play
adventure, Cauldron Station, which is included in this booklet.
Though each character template has been prepared in advance, you still get to select a name for your hero. Your hero can be male or female, and you can assign any personality you choose. The name you select can reflect the hero's personality or career (such as "Hunter" for a Combat Spec or Free Agent), or it can be the complete opposite of it (such as "Bruiser" for a Diplomat or Tech Op).
Every hero has six Abilities.
Equipment
Each character template includes a selection of equipment the hero has access to -- one or more weapons, some type of armor, and other gear. The game data given for weapons and armor is explained below.
The numbers on the line identifying a weapon indicate how much damage the weapon inflicts on an Ordinary, Good, or Amazing success. This damage is either stun (s), wound (w), or mortal (m) damage.
On the next line, "Range" gives the distance at which a weapon can strike a target, either "Personal" if physical contact is necessary, or a series of numbers representing short/medium/long range (in meters) for a weapon that fires projectiles or energy beams. The range at which a weapon is used often has an effect on the attacker's chance of hitting the target, as explained in the Gamemaster's Fast-Play Rules.
"Type" refers to the kind of damage a weapon inflicts, either low impact (LI), high impact (HI), or energy (En).
For armor, the die ranges preceding "LI," "HI," and "En" indicate the amount of damage the armor stops when the wearer is hit by a weapon that does this type of damage. If a subtraction from a die roll produces a result less than 1, the armor failed to block any damage on that attack.
PLAYING THE GAME
The basic rule at the foundation of the Alternity game is a simple one. Your hero has some important game statistics, including Ability Scores, skill scores, and his action check score. In many cases, when your hero attempts to accomplish something, the Gamemaster asks you to roll dice. You then try to roll a number that's equal to or less than the appropriate score. If you roll higher than your hero's score, your hero fails. Whenever a hero tries to do something that might fail, this dice roll determines if he succeeds.
Rolling Dice
The Most Important Rule: Not every action requires a dice roll!
Your Gamemaster will only call for dice rolls in dramatic situations to determine the success of an action whose outcome is in doubt, or when he or she needs to judge the degree of an action's success.
For instance, if your hero wants to walk across a street or carry a small pack, no dice rolls are necessary. But if he wants to cross the street while carrying a wounded companion, being shot at by snipers, and targeted by insane motorists, then the situation is a dramatic one, and dice should be rolled.
A pilot hero trained to fly a spacecraft and read star charts doesn't need to make a dice roll to perform the normal duties associated with her area of expertise. But when these actions go beyond the call of duty and lives hang in the balance (or at least during dramatic situations), dice should be rolled.
The Control Die and Situation Dice
The Alternity game uses two kinds of dice: a control die and a situation die. Whenever the Gamemaster calls for a dice roll, you roll one control die and one situation die. The numbers that come up on these dice combine to indicate a success or a failure.
When you roll the dice, in game terms you're making a check for your hero -- in effect,"checking" to see how the dice roll compares to one of your hero's scores.
- If you're comparing the roll to your hero's action check score to see how soon he gets to attempt his next action, the roll is an action check.
- If your hero uses a skill (comparing the roll to his skill score), this roll is a skill check.
- If you're checking against one of his Ability Scores, then the roll is a feat check.
In any case, you're looking to get as low a result as possible-the lower the roll, the better the chance that your hero succeeds at what he's trying to do.
- The control die is always a 20-sided die (referred to as a d20).
- The situation die for any particular check is one of the following: a four-sided die (d4), a six-sided die (d6), an eight-sided die (d8), a 12-sided die(d12), or a 20-sided die (d20). There's also a d0, a place-holder to represent the situation die in a case where success is determined by only the roll of the control die.
Further, the situation die on any check is designated as either a plus die or a minus die. A plus die, such as +d4, is bad for the roller, because it tends to produce a higher result. A minus die, such as -d6, is good for the roller, because it helps to achieve a lower result.
Add or subtract the situation die from the control die as instructed by the Gamemaster. If the result is equal to or less than the score related to the hero's action, the action succeeds. If the result is greater than the score, the action fails . The degrees of success are explained later.
Example: Your hero wants to make a quick repair to his motorcycle so he can stay on the trail of the fleeing criminals. This action is a skill check using your hero's score in the Technical Science-juryrig skill. The Gamemaster tells you to roll the control die and a -d4 (the situation is in your hero's favor, so the d4 roll is subtracted from the d20 roll). Your hero's juryrig skill score is 13.
You roll the dice, and the following numbers come up: 14 on the control die, 3 on the situation die. The result is 11 (14 - 3 = 11), which is lower than your hero's juryrig score. The action succeeds -- but note that if the situation die had been +d4, or even +d0, the 14 on the control die would have made the outcome a failure, because 14 is greater than your hero's score.
Situation Die Steps
The Situation Die Steps Scale has been designed to help you quickly determine what situation die to roll with the control die. It's printed below and on the hero sheet.

Your Gamemaster tells you what bonus or penalty your hero receives when you make a roll to see if your hero can perform a certain action.
A +1 step situation penalty means you start with your hero's base situation die (see the sidebar below) and move one step in the "Penalty" direction to find the die you'll be rolling. For instance, if your hero's base situation die for an action is +d4, then a +1 step situation penalty changes the die to +d6.
A -2 step situation bonus means you find your hero's base situation die on the scale and move two steps in the "Bonus" direction. For example, if your hero's base situation die for an action is +d4, then a -2 step situation bonus changes the die to -d4.
| The Base Situation Die
Before you can use the Situation Die Steps Scale, you need to know where to start on the scale. That starting point is known as the base situation die.
|
Degrees of Success
Every dice roll has one of five possible results: Critical Failure, Failure, Ordinary success, Good success, or Amazing success. The lower your dice roll, the greater the degree of success your hero achieves.
The three numbers associated with every skill score and action check score (the base score and two smaller numbers), represent the dividing points between the degrees of success. Regardless of what number comes up on the situation die, a roll of 20 on the control die always produces a Critical Failure. Generally, this means that some sort of bad luck has befallen the hero, and no matter how high his skill score is, this particular action doesn't succeed.
A result greater than the base score (as we've already explained) is a Failure. A result equal to or less than the score is an Ordinary success; equal to or less than the second number is a Good success; and a result equal to or less than the smallest of the three numbers is an Amazing success.
On the character templates in this booklet, the "Action Check Score" line begins with a number that represents a Marginal result. A hero can't get a Failure or a Critical Failure outcome when he makes an action check; if the dice roll yields a number greater than his action check score, the "Failure" is considered to be a Marginal result instead.
Scenes
Every adventure your Gamemaster sets up is built out of scenes. A scene is a distinct episode that has a clear beginning and ending. The three types of scenes are combat, encounter, and challenge.
A combat scene lasts from the start of a battle to its conclusion. An encounter scene lasts from the moment characters meet to when they part company. A challenge scene lasts as long as it takes the heroes to identify the challenge, and then overcome it or be defeated by it.
Action Rounds
For the purpose of determining who acts when in a scene, every scene is divided into action rounds. During an action round, every hero performs one or more actions.
Each round is divided into four phases. Each phase corresponds to one of the degrees of success: Amazing, Good, Ordinary, and Marginal, in order from the first phase to the last. Each hero can attempt only one action in a phase.
To determine who acts first in a round, every participant makes an action check by rolling a d20. The result determines the earliest phase in which a character can act. So, if a hero rolls a Good action check, the earliest phase he can act in is the second, or Good, phase.
All actions in a phase are considered to occur simultaneously, with the results of those actions being applied at the end of the phase.
Your hero can act in as many phases as he has actions per round: two actions per round means he can act in up to two phases of a round. But if an action check result indicates that your hero can't act until the Marginal phase, then he can only act once in the round (in the Marginal phase).
Example: Your hero has an action check score of 11 and two actions per round. At the beginning of a round, the Gamemaster calls for action checks. If you roll a 5 (a Good success for a score of 11), the earliest phase in which your hero can act is the Good phase. Since he has two actions, he can act once in the Good phase and once in the Ordinary phase, or he can save his second action for the Marginal phase.
If you roll a 13 (a Marginal success), your hero can't act until the Marginal phase (the last phase of the round). In this case, he can only act once, losing his second action because he didn't react quickly enough.
Damage
Heroes lead challenging and sometimes dangerous lives. Eventually, your hero is going to suffer damage. As indicated on the character templates, damage in the fast-play system comes in three forms: stun, wound, mortal, and fatigue
Stun Damage
Stun damage is the lightest type of damage your hero can sustain. It represents shocks and bruises that rattle a hero but don't result in lasting injuries. When your hero suffers stun damage, mark off one stun box for each point of stun damage she sustained in the phase that just ended.
- Knockout: When all of her stun boxes are marked, your hero is knocked out and can perform no actions until she recovers.
Wound Damage
Wound damage Wound damage is more serious than stun damage. It represents injuries that cause lasting harm to the body. When your hero receives wound damage, mark off one wound box for each point of wound damage he sustained in the phase that just ended.
- Secondary Damage: Wound damage causes secondary stun damage. For every 2 points of wound damage inflicted on your hero, he also receives 1 point of stun damage.
Mortal Damage
Mortal damage Mortal damage is the most severe form of damage. It represents massive injuries to vital body parts. When your hero receives mortal damage, mark off one mortal box for each point of mortal damage she sustained in the phase that just ended.
- Secondary Damage: Mortal damage causes secondary stun damage and wound damage. For every 2 points of mortal damage inflicted on your hero, she also receives 1 point of wound and 1 point of stun damage.
- Dazed: Mortal damage takes a toll on a hero immediately. For every mortal box marked, your hero receives a +1 step situation penalty to any actions she attempts.
- Death: When all of your hero's mortal boxes are marked off, she dies.
Recovery
How your hero recovers from damage depends on his condition (conscious or knocked out) and the type of damage he has suffered.
READY TO GO?
Now that you understand how the basic structure of the Alternity game works, you're ready to send your hero into action.
You'll probably be going through the adventure presented in the Gamemaster's Fast-Play Rules (the other half of this document), but if your Gamemaster has experience in designing original adventures, he may have something else planned for you and your companions.
Is there something that doesn't seem as clear as it should? Sometimes you can solve a problem by simply rereading the section of text that's giving you trouble. Often, an even easier way to clear things up is to jump right in -- sit down with your friends, get an adventure under way, and start rolling dice. It won't be long before you'll start to see how the game system works.
THE Alternity GAME
Tomorrow is out there. It can be as close as the next dawn or as distant as humanity's twilight, when the Earth expends its last, dying gasp. What tomorrow waits beyond the dawn? The possibilities are as endless as your imagination -- and that's what the Alternity game is all about. The fast-play rules have introduced you to the system. Now, here's a brief look at what's contained in the two hardcover rulebooks. The Player's Handbook will be the initial release in April 1998, to be followed by the Gamemaster Guide one month later.
HERO CREATION
The material in Chapter 2 of the Player's Handbook allows you to create any type of modern to far-future hero you can imagine. The process is much more detailed than the fast-play rules, providing you with more choices and plenty of decisions to make as you create your hero. After developing the concept of what you want your hero to be, you select a species. Five alien species are presented in the Player's Handbook, and the Gamemaster Guide offers guidelines for designing new species of your own. Next, you assign Ability Scores and purchase skills. The important thing to remember throughout the hero creation process is that you're in charge. All of your hero's characteristics and attributes -- the qualities that make him different from every other character in the world -- are the result of decisions you make.
SUPPORTING CAST
One of the Gamemaster's rewards is the opportunity to create and portray intelligent supporting characters. Chapter 6 of the Gamemaster Guide describes supporting characters that serve an array of purposes in your game. Realistic motivations, appropriate game stats, and believable personalities are all crucial components of a supporting character.
Villains concoct schemes, obstacles, and complications. Sidekicks, controlled by the players, and allies, controlled by the Gamemasters, contribute extra skills and firepower. Employees and followers handle jobs that heroes and villains don't have time for. Experts tackle questions and problems that heroes cannot. Finally, extras add spice, color, and detail to your world.
The last section of Chapter 6 provides a selection of supporting character templates that can be used to quickly introduce all sorts of supporting cast members, complete with Ability Scores and skills, into the adventure.
HEROES IN ACTION
Chapter 3 of the Player's Handbook begins with a general discussion of the different styles you can use to portray your hero in action, and moves into full explanations of some of the concepts that were introduced in the fast-play rules. You'll get another level of detail in the Alternity game system -- comprehensive rules for dealing damage and recovering from damage, movement, throwing grenades, and getting the drop on the bad guys, to name a few.
The corresponding chapter in the Gamemaster Guide discusses the most commonly used rules of the game. You'll find ways to resolve actions, combat, and hazards. This chapter also contains a discussion of planetary environments (gravity, radiation, atmosphere, pressure, and heat) and their effect on characters during play.
SKILLS
Skills are the heart of the Alternity game system. Most of what a hero is capable of doing -- fighting an opponent, piloting a spacecraft, closing a big business deal, developing a vaccine for a deadly virus -- is governed by what skills the hero possesses and how accomplished he is at using those skills. Chapter 4 of the Player's Handbook begins with an explanation of how skills are used and how they are organized. After that, each separate skill is described in detail. The Gamemaster Guide provides additional detail on the use of skills.
ROLEPLAYING EXTRAS
Perks and Flaws provide a hero with advantages and disadvantages. Each perk and flaw represents one extra handle for a skilled player to use in bringing his character to life. No one remembers the Combat Spec who plunges into battle -- that's what Combat Specs are for. But everyone remembers the Combat Spec who purchased Celebrity and enjoys galaxywide fame, and no one can forget the Free Agent created with the Powerful Enemy flaw who's constantly being hunted by his lifelong nemesis. Descriptions of perks and flaws appear in Chapter 5 of the Player's Handbook.
Careers, complete with concepts, suggested skills, and "signature" equipment, appear in Chapter 6 of the Player's Handbook. Careers represent specialization of focus within each profession introduced in the fast-play rules. For example, possible careers within the Tech Op profession include doctor, pilot, engineer, and scientist.
Attributes -- motivation, moral attitude, and character traits -- are tags and hooks that provide definition and detail to a hero. They're used to make heroes and the supporting cast more than just an accumulation of statistics and equipment, to flesh out these individuals and give them depth. Attributes also serve as an aid and an encouragement to good roleplaying, which should be the goal of every player. Attributes are described in Chapter 7 of the Player's Handbook.
ACHIEVEMENTS
As heroes complete adventures, the Gamemaster awards them achievement points based on the magnitude of their accomplishments and how well they succeeded in roleplaying their characters. Players and Gamemasters need a way to measure how well the heroes have done. Chapter 8 describes the Alternity rules for achievement levels and achievement points.
EQUIPMENT
A big part of what makes a hero distinctive is the gear he owns or carries. The hotshot star pilot needs a ship and a reliable sidearm to complete his image, just as the gunfighter in an old Western needs a horse and a trusty .45 revolver. Of course, a hero can still be a formidable character if he loses his pistol or his computer gauntlet or his trauma pack in the course of a story, but his trademark equipment is as much a part of his makeup as his physical features and his attitude. Chapters 9, 10, and 11 of the Player's Handbook describe the fundamental tools, equipment, services, computers, weapons, armor, and other accessories that heroes can purchase. Chapter 9 also provides an overview of Progress Levels, which is the framework the Alternity game uses to define when and if a certain piece of equipment is available.
VEHICLES & SPACESHIPS
Adventures often require travel -- across cities, countries, or galaxies. Chapter 12 of the Player's Handbook describes some of the vehicles available in the Alternity universe, from primitive rafts to star-spanning spaceships. Each of the land, water, air, and space vehicles is a stock vehicle, with average characteristics. You'll find rules for using these vehicles in chases and in combat. Chapters 10 and 11 of the Gamemaster Guide contain rules for customizing vehicles and constructing spaceships with weapons, sensors, defensive systems, and many other accessories.
GAME OPTIONS
The Alternity game system includes several options you can use to add diversity to any game style or genre. Chapter 13 of the Player's Handbook contains rules for mutations and mutant heroes. Chapter 14 includes psionic powers, skills, and mindwalker heroes. Chapter 15 covers cybernetic gear and rules for acquiring it and using it. In the Gamemaster Guide, Chapter 16 has guidelines to help you decide which game options to use in your campaign.
CAMPAIGN &ADVENTURE DESIGN
One of the Gamemaster's most creative exercises is the construction of an imaginary world or universe. In your universe, you decide everything. What genre does your setting fall into? Which Progress Level or technical innovations can define it? What kinds of aliens are present for use as heroes or potential villains? How is the world organized? Who's in charge, and why? Although answering these questions could seem to be a complex and difficult task, an organized approach to campaign design lightens the load considerably.
Chapters 13 and 14 of the Gamemaster Guide contain advice on building an exciting setting and administering it over the lifetime of your campaign setting. They also have information on putting together the physical details of your setting: galaxies, planets, and civilizations. Chapter 15 follows this discussion with suggestions for the design of your own adventures, filled with exciting beginnings, compelling action, and a satisfying resolution for everyone.
MORE TO COME...
Over the next few years, the Alternity game system will grow to include rules expansions, accessories, adventures, and campaign settings. The first of these products are:
- Black Starfall and Red Starrise: Free introductory adventures that will be available in stores when the Player's Handbook and the Gamemaster Guide are released.
- Gamemaster Kit: A screen for the game moderator, with important tables, diagrams, and hero character sheets.
- Star*DriveTM Campaign Setting: A galaxy-spanning, space opera milieu full of intrigue, danger, and forays into the unknown.
- Star*Drive Alien Compendium: Creatures benign and bizarre that you can use to populate your Alternity game universe.
|
GAMEMASTER'S FAST-PLAY RULES
SO YOU WANT TO BE THE GAMEMASTER?
This section of the fast-play rules document provides an overview of the Gamemaster's role in an Alternity game. It contains a short adventure that you can use to introduce your players to the game and familiarize yourself with moderating a roleplaying session.
The Player's Fast-Play Rules, which you need to read first, presents the bare bones of the rules system. Read that section of the document if you haven't done so, and then come back here.
What does a Gamemaster do? Basically, he presents adventures for the players to run their heroes through, and acts as the moderator of the rules. In this section of the fast-play rules document, you'll find an introduction to the
Alternity game that can get you off to a good start for your first game session.
The Role of the Gamemaster
As the Gamemaster, you have a number of jobs to handle during and between game sessions. Unlike other types of games that have strict rules and deal with limited situations, a roleplaying game such as the Alternity game is as wide open as the players' imaginations. For this reason, the presence of a game moderator to act as referee, story designer, and narrator is essential.
The players interact with each other and the game environment through the actions of their characters, the heroes. The Gamemaster describes each scene, directs the action, and plays the roles of the supporting cast members -- villains, allies, and extras who inhabit the campaign world.
However, the Gamemaster isn't competing against the players. When the Gamemaster and the players get together to tell a fun and exciting group story, everybody wins. That's the power and appeal of role playing.
KEY CONCEPTS
Let's take a look at some of the key concepts behind moderating the Alternity game. Some of these terms have also been defined in the Player's Fast-Play Rules, but they're repeated here for the sake of completeness within this section.
- Gamemaster: The participant in the game who acts as the moderator, narrating adventures and controlling characters who are involved in the story but aren't under the direct control of the players.
- Hero: An imaginary character controlled by a player.
- Supporting Cast: The other characters who appear in every story: friends, enemies, and incidental characters whom the heroes interact with. Members of the supporting cast are controlled by the Gamemaster.
- Setting: The imaginary context and environment within which the heroes interact with situations. Using the Alternity game rules, any modern to far future science fiction setting can be created.
- Adventure: A scenario in which the heroes interact to create a group story. As Gamemaster, you present an opening situation or scene (called the"trigger"). The rest of the adventure unfolds through the actions of the heroes (as dictated by their players) and the moderation of the Gamemaster (through story events and the supporting cast).
- Campaign: A continuing series of adventures that takes place in a single setting and focuses on the same group of heroes. A campaign can be finite, ending after as many adventures as necessary to tell the complete story; or it can be an ongoing tale, progressing like a television or comic book series.
- Group Story: While a regular story, such as found in a movie or a book, features a set beginning, middle, and ending, a group story is more dynamic. The Gamemaster has an outline that provides a series of encounters and events, and a few possible ways the adventure could end. The dynamic comes from the group -- the players and Gamemaster -- who determine the course of the story and its outcome through the interaction of their imaginary characters. In a group story, no one -- not even the Gamemaster -- knows exactly how it all will end.
- Game Session: One distinct period of game play; a time when you gather your friends to play the Alternity game. Some adventures can be completed in a single session; others might require several sessions to reach a conclusion.
PRESENTING AN ADVENTURE
A roleplaying game's action takes place in an adventure. Within its structure, the participants create the group story. The Gamemaster's role in the adventure centers around presenting and narrating the story, portraying supporting cast members, and moving the story along at a satisfying pace. Whether you use published adventures (such as Cauldron Station, presented at the end of this section) or you create your own epics, the Gamemaster's role remains the same.
Narration
The heroes can't perform heroic actions or daring deeds in a vacuum. They need to be involved in a story during which they act, react, and create a fulfilling tale. A story consists of a beginning, a middle, and an end, and each story should be filled with conflicts and goals-in other words, obstacles for the heroes to overcome and objectives for them to achieve. It's up to the Gamemaster to have the basics of a story ready when the game session begins.
Remember, though, that the story will be completed by the group-through the actions of the heroes and their interaction with your supporting cast. The heroes play an important part in determining how a story takes shape, and you should make swarthier decisions play a part in the process.
You must develop a basic plot (or use a plot from a published product), provide motivations and objectives for the heroes, and have an exciting idea for the ending. A plot requires enough background material so that the story feels like it fits the campaign setting. Other elements that make a good basic plot include a major antagonist (the villain), the antagonist's nefarious scheme, and motivations to make the heroes want to get involved. These elements come together in the adventure's opening scene-called the trigger.
The Cauldron Station adventure provides an example of how these elements work together.
Supporting Cast
Each of the players controls one hero at any given time. The Gamemaster controls all other characters in the adventure. The most important supporting cast member is the major antagonist. A good villain sets the mood of a story and can even make the heroes more memorable-no one recalls who rounded up the spaceport thugs, but everyone remembers the heroes who took down Captain Blackstar, the scourge of the Frontier!
Supporting cast members include the major villain; his or her associates and hired hands; the authority figures who command or employ the heroes; the informants, witnesses, and shop owners the heroes interact with; and the valued friends, hirelings, and allies ready to help the heroes at a moment's notice. The Gamemaster needs to be ready to run these characters as they are called upon, or to improvise as the need arises.
It's important for the Gamemaster to give each supporting cast member-especially major opponents and allies-much the same consideration players give their heroes when they create them.
Some supporting cast members should be fully developed, with a complete set of skills and vital game statistics.
Other characters, such as minor opponents, experts, and bystanders, need only the skill scores and statistics that might come into play during a scene. For example, give a common thug a combat skill or two, durability ratings, and a weapon; give an expert just the skill scores needed to use his expertise on the heroes' behalf.
The best part about controlling the supporting cast is that you get to create all kinds of personalities during the course of play. Ham it up, play it straight, or go for the dramatic-depending on the mood of the adventure and the personality of the character in question.
If you want, use a unique voice for each character by doing accents (a French Combat Spec, a Russian Diplomat), employing different styles of speech (a formal-sounding Free Agent, a Tech Op who uses lots of slang expressions), or giving characters signature phrases (such as an informant who always spouts, "Whatever you say, Boss, whatever you say").
Remember, you're not competing against the players! If anything, the heroes should get a break now and then just because they're heroes. So, be impartial - don't favor the supporting cast over the heroes. That just decreases the all-important fun factor for everyone involved.
Pacing
Another aspect of presenting an adventure is the pacing of the story. The story shouldn't artificially push the heroes to meet some imaginary schedule. Instead, watch how the scenes play out. When a scene starts to drag and the fun factor begins to flag, that's when the Gamemaster steps in to give the scene a boost. How? Have a supporting character show up with a clue, a nudge in the right direction, or a chip on his shoulder that might lead to a combat scene. See Cauldron Station for examples of scene boosters.
Don't create an adventure outline that's so complete the heroes can't make any decisions without violating your plot. Start the adventure with action, and have lots of other action ideas ready to insert into the flow as the game session progresses. Use combat, challenges, encounters, conflict, tension, humor, and mystery to keep an adventure moving toward its dramatic conclusion.
The basic rule for pacing is that as long as the players are having fun, stay in the current scene. When the action bogs down, then the Gamemaster must help the pacing by getting things moving again.
Moderating the Rules
The Player's Fast-Play Rules section of this document gives you the basic mechanics of the Alternity game. That's all you need to introduce your players to the game system and run the adventure in this section. In play, it's up to the Gamemaster to moderate the game so that everyone has fun, plays fair, and is challenged. Of all these, the emphasis is always on fun. If a rule gets in the way of everyone's enjoyment, change it. But change it consistently and after some consideration. Don't just change a rule for the sake of change.
Final decisions are always left to the Gamemaster. Can the heroes perform a particular action? Can they even try it? That's up to you. Make your decision based on the need to keep the story moving, your interpretation of the rules, and whether or not the action fits the story and increases everyone's enjoyment of the game. Be fair and impartial in your treatment of heroes and supporting characters. Challenge the players and their heroes. The players want to see their heroes tested, to experience the thrill of competing against the odds and coming out on top. Heroes do this sort of thing all the time! Just make sure the players have decisions to make and options to choose from as the adventure unfolds.
If someone disagrees with a decision, call a time out and discuss it with the group. You still get to make the final call, but you can reduce the possibility of hard feelings if you moderate the game fairly. The goal is to tell a good group story and to have fun, not to abuse the heroes.
Sometimes the dice are just going to fall the wrong way. That's okay. But you might want to give the players a break now and then. After all, it's no fun for a player to lose a hero in a stupid and random way. Be lenient when determining the difficulty of a particular action, or change the result before revealing the outcome to the players. This sort of manipulation is the Gamemaster's prerogative, but use it sparingly-and always in the interest of keeping the story moving and the fun factor high.
THE SETTING
The Gamemaster determines the setting for his campaign. Depending on the features of a particular setting(such as technology, genre, and scope), certain portions of the rules-high-tech gear, psionics, and aliens, for instance-may or may not be used. For example, a space opera setting usually has faster-than-light spaceships, energy weapons, and tons of nonstop action. A near-future techno-thriller setting, however, has a gritty, hard-edged feel, more familiar technology, and only deals with the problems of a single world.
In the Gamemaster Guide, the process of creating settings is discussed
in more detail. The Cauldron Station adventure in this document takes
place in a traditional space opera setting.
USING THE GAME MECHANIC
The Alternity game is built around a core mechanic that has nearly universal application. All heroic actions in the game can be resolved by rolling just two dice: a control die and a situation die. A control die is always a d20; a situation die can be a d4, d6, d8, d12, or d20. Depending on how hard or easy a particular task is, the situation die is added to or subtracted from the control die, as detailed in the Player's Fast-Play Rules.
You can use the dice in varying ways, though the mechanic is always the same: Roll two dice to achieve a number that's equal to or less than a character's appropriate score. If the task is associated with a skill, then the skill score is used. If it's a feat, then the associated Ability Score is used. In all uses of dice during a game session-except when rolling for damage-low results are better than high ones.
Use the mechanic to determine the success of an attack, using an appropriate combat skill; to overcome a challenge, using a physical or mental skill; or to determine the outcome of an encounter, using a Personality skill in conjunction with good roleplaying.
The Most Important Rule
Not every action requires a dice roll. Repeat this sentence and apply it often. When the heroes attempt normal, everyday tasks, they should accomplish them without consulting the dice. In heroic situations, when the outcome is in doubt and the result could mean life or death, then have the players roll dice.
Situation Die Steps
The best tool you have as the Gamemaster is your ability to set the odds of any given task. You can do this by adding bonuses or penalties for given situations and counting in the appropriate direction on the Situation Die Steps Scale (presented in the Player's Fast-Play Rules). Or, if you're more inclined toward quick resolutions, simply eyeball it; select the modifier that gets closest to how difficult or easy you want the task to be.
| Examples of Situation Modifiers |
Weapon Range
Pistol
Rifle
SMG
|
S
-1 step
-1 step
-1 step
|
M
+1 step
None
+1 step
|
L
+3 steps
+1 step
+3 steps
|
Target has Cover
Light cover
Medium cover
Heavy cover
|
+1 step penalty
+2 step penalty
+3 step penalty
|
Situation
Amazing difficulty
Good difficulty
Ordinary difficulty
Marginal difficulty/ease
Ordinary ease
Good ease
Amazing ease
|
+3 steps
+2 steps
+1 step
None
-1 step
-2 steps
-3 steps
|
| Eyeballing It |
Situation Description
Extremely easy
Very easy
Easy
Average
Tough
Hard
Challenging
|
Modifier
-3 steps
-2 steps
-1 step
None
+1 step
+2 steps
+3 steps
|
Situation Die
-d8
-d6
-d4
+d0
+d4
+d6
+d8
|
Putting It Into Practice
What do you actually do with this information?That depends. Here are examples of both methods in action. Use either method or a combination of the two, as you see fit.
- The Step-by-step Method: Michele's hero, Jade, wants to take a shot at the villainous bounty hunter. Jade has the pistol skill, so she has abase situation die of +d0. The bounty hunter is at medium range (+1 step penalty) and has light cover (+1 step penalty). In addition, because Jade is standing atop a moving aircar, you declare that the situation has a Good level of difficulty (+2 steps). By counting out the steps on the Situation Die Steps Scale, the Gamemaster determines that Jade has a final situation die of +d12. Michele rolls d20+d2, hoping to achieve a total that's equal to or less than Jade's pistol score. If she succeeds, then Jade hits her target, scoring either an Ordinary, Good, or Amazing success, as detailed in the Player's Fast-Play Rules.
- Eyeballing It: Dave's hero, Jack Everstar, needs to slip past the customs official. Since Everstar doesn't have the sneak specialty skill, his base situation die is +d4. You decide that the official is particularly vigilant today. This makes the situation Hard, causing Everstar to take a +2 step penalty. Dave has to roll d20+d8, hoping for a result equal to or less than Everstar's Stealth skill score.
Action Rounds
How action rounds work is described in the Player's Fast-Play Rules. Although actions in a phase are considered to occur simultaneously, you don't want everyone rolling dice at the same time. Instead, all characters who are entitled to an action in the same phase should act in the order of their action check scores-highest score first. The results of their actions(such as damage) are applied at the end of the phase, thus simulating simultaneous activity.
Example: Jade, Everstar, and the bounty hunter Kreet each achieve a Good action check result. Their action check scores are 13, 10, and 15, respectively. For ease of play, Kreet acts first in the Good phase, followed by Jade, then Everstar. The results of each character's action are applied after everyone has acted, taking effect in the Ordinary phase. If the characters have actions remaining, they perform them in the same order in the Ordinary phase.
Damage
Damage comes in four types, as described in the Player's Fast-Play Rules: stun, wound, mortal, and fatigue. If a character is targeted by an attack or other damage-causing condition, the degree of success that attack achieves determines the type and amount of damage suffered by a character.
"Gear for Fast-Play Heroes" in the Player's Fast-Play Rules lists some examples of weapons and armor, and includes their important statistics.
Example: Kreet fires his 11mm charge pistol at Jade. He achieves a Good success against Jade. The damage range for a Good success with that weapon is d6+2w. Since Kreet is a member of the supporting cast, you(as the Gamemaster) roll to determine how much damage Kreet inflicts. The most he can do is 8 points of wound damage on a roll of 6.
Secondary Damage
Serious, lasting injuries -- mortal damage and wound damage -- cause secondary damage to the character who is injured. For every 2 points of wound damage inflicted on a character, that character also suffers 1 point of stun damage. For every 2 points of mortal damage a character receives, that character also suffers 1 point of wound damage and 1 point of stun damage.
Example: Jade returns fire with her 11mm charge rifle and gets an Amazing success against Kreet. The damage range for an Amazing success with her weapon is d6+1m. Jade's player, Michele, rolls d6 and gets a result of 4. Kreet suffers 5 points of mortal damage (4 + 1 = 5) plus secondary damage of 2 wounds and 2 stuns.
Armor
Characters can wear armor to protect them from the dangers of battle. Armor reduces the amount of primary damage a hero receives-but armor has no effect on secondary damage.
Example: Jade is wearing a CF long coat when Kreet hits Jade for 8 wounds. Now Michele gets to roll to see how well Jade's armor protects her hero. The CF coat blocks high impact(HI) damage at a rate of d4+1. Michele rolls d4 and gets a result of 3, for a total of 4 (3 + 1 = 4), so the number of wounds is reduced by 4 points. Michele marks off 4 wound boxes on Jade's hero sheet (8 - 4 = 4).
Recovery
After a character suffers damage, he or she can get back to full health in a number of different ways:
- Wound damage, but not mortal damage, can heal naturally at a rate of 2 wound points per week of rest and recuperation.
- The Knowledge-first aid skill can heal stun damage on conscious patients, restoring 2, 3, or 4 stun points depending on the degree of success achieved on the first aid skill check (Ordinary, Good, or Amazing).
First aid can also be used to revive a character who was knocked out due to stun damage, restoring 1, 2, or 3 stun points depending on the degree of success.
This skill can be used to heal wound damage; any success restores 1 wound point.
- The Medical Science broad skill or the treatment specialty skill can be used to heal stun damage on conscious patients, as per first aid above.
Medical Science or treatment can also be used to revive a character who was knocked out due to stun damage, restoring 2, 3, or 4 stun points depending on the degree of success.
This skill can be used to heal wound damage; any success restores 2 wound points.
- The Medical Science-surgery skill can be used to heal wound damage and mortal damage; a success restores 1 point of mortal and 2 points of wound damage. This skill can be used on a specific patient once every hour. If a Critical Failure is achieved, the patient suffers an additional point of mortal damage.
- Any remaining stun damage disappears at the end of a scene.
CAULDRON STATION
An Introductory Alternity Adventure
This adventure uses the fast-play rules to introduce Gamemasters and players to the Alternity game. Only the Gamemaster should read this adventure before play begins. If players read the adventure before their heroes get to participate in it, they'll ruin the fun of being surprised and will spoil the group storytelling experience for everyone.
As the Gamemaster, it's your job to read through this adventure and become familiar with the basic plot and mood of the story. When you're ready, let the players create heroes using the Player's Fast-Play Rules. Encourage the players to assemble a balanced group of heroes, with at least one representative from each of the professions. The heroes will need brains, brawn, and negotiating skills to survive the challenges of Cauldron Station.
Background
This adventure takes place in a far-future, space opera setting. The heroes have access to a number of high-tech tools that don't exist in the current day and age. In addition, the tone is heroic, larger than life, and fits in neatly with your favorite science fiction film epic.
Cauldron Station is a mining outpost on the isolated planet known as Cauldron. The name fits the world very well. Cauldron is literally a hellish place, as it orbits exceedingly close to its star and has a high volume of volcanic activity. Even in the relative coolness of a giant canyon, Cauldron Station endures temperatures of 500deg. C during the heat of the day. Through the wonders of far-future technology, the mining outpost protects its workers from the deadly environment, allowing them to reap the profits their processed ores bring on the open market.
The station is a self-sustaining, totally enclosed system that holds a comfortable environment within its insulated walls and pressure domes. It keeps the heat and toxic atmosphere out, using the same technology that allows this future civilization to explore and travel the star lanes. Even the mines are protected so that the workers can labor safely; the mine shafts are drilled beneath the protection of great pressure domes.
The heroes come to Cauldron in their trader class starship, the Nebula Bounty, for business purposes. They have a shipment of 3D computer programs to sell to the outpost, including entertainment programs, news and technical journals, and the latest Grid interactives to cheer up the recreation-starved miners. In addition, they plan to fill their cargo holds with processed ore. The construction projects in Concord space are in desperate need of quality ore-and they're willing to pay extremely well for it.
Unfortunately, a few events combine to make this particular trading mission a lot more hazardous than usual.
- First, the region of Cauldron housing the outpost is experiencing a powerful magnetic storm. Communications into and out of the base have been disrupted by the magnetic activity, so the heroes must make their approach without any help from the outpost traffic beacons.
- Second, the storm also plays havoc with the ship's sensors, so the vessel passes through a spume of molten molybdenum expelled by one of the planet's many active volcanoes. This superheated liquid metal clogs the ship's tachyon intakes. While this doesn't hinder the ship's normal performance, it does make it impossible for the vessel to starfall -- to travel at faster-than-light speeds.
- Third, the outpost has its own problem. Two creatures native to Cauldron's environs have invaded the outpost, knocking out power and killing a significant number of miners. Because of the disruption in communications, the heroes don't know about this problem ahead of time. They'll discover it as they explore the station.
Recent Events
What's been happening within Cauldron Station? The miners extended a shaft that opened into a lava flow deep beneath the surface of the planet. This shaft served as an access to the outpost for a pair of native creatures deadly animals that the miners have dubbed "moltenoids." The moltenoids invaded the mining dome four days ago. Twelve miners were killed before the survivors managed to contain the creatures within the mining dome by sealing the airlock doors leading into the dome.
The creatures killed not out of maliciousness, to acquire food, or to protect themselves, but just as a byproduct of their alien physiology (see "The Supporting Cast" later in this section of the document). The miners theorized that, since these creatures preferred to live in extremely hot conditions, lowering the temperature inside the mining dome would drive the beasts back into the shaft, which could then be sealed.
Instead of returning to the shaft, however, the beasts created a different exit. The moltenoids melted a path through an emergency closet and into the conduit vents within the station's insulated walls. From these conduits, the creatures gained almost total access to the outpost.
More deaths and many injuries followed. The station administrator and the security officer eventually decided to seal off this wing of the outpost from the rest of the station. That was two days ago. About a day later, one of the creatures reached the power reactor and shorted out most of the station. Now, with total life support collapse set to occur in six hours, the station is on the verge of death-as are all the miners and station personnel trapped within.
Adventure Outline
Cauldron Station presents three obstacles that the heroes must overcome: the damage to their ship, the station's power outage, and the invading creatures. The action is broken down into an opening trigger and three scenes that follow, as well as additional events based on the map (see below) that can be used or ignored as you see fit.
- Trigger: The adventure begins after the heroes have landed on Cauldron and entered the airlock that leads into the station. Three guards, led by station security officer Birrden, set an ambush for the heroes. They see the heroes as unknown invaders, perhaps pirates or smugglers seeking to profit during the station's current crisis. The opening scene of the adventure definitely has the potential to become a combat scene, although the heroes can negotiate with Birrden if they are so inclined (turning it into an encounter scene).
- Encounter Scene: Station Administrator Crowell has gathered the other survivors in the ore storage bay. With the temperature rising and the air getting less breathable with every passing hour, Crowell and his lot are getting closer and closer to panic. They have no surviving technicians, no one with any hope of repairing the life support system. They do have something the moltenoids want, however, which the heroes can use in various ways if they are so inclined. The problem is, Crowell and his band refuse to open the storage bay airlock. The heroes will have to enter by force or-the preferred method-negotiate until Crowell is talked back to his senses.
- Combat Scene: Two moltenoids are loose in the facility. No matter how friendly the heroes might want to be, the only viable way to deal with these creatures is either to destroy them or otherwise render them helpless so they can be removed from the station without further harm befalling the miners. One of the creatures must be forcibly removed from the lair it has established in the engineering center before power can be restored to the station. The other creature roams through the wing, inflicting damage simply due to the heat of its passage. The heroes might decide to hunt the beast or set traps for it (possibly using the material provided by Crowell from the ore bay).
- Challenge Scene: It is critically important to get the life support system back on line. To do this, the heroes must remove the resident moltenoid from the engineering center, repair the damaged power generator, and enter the conduits beneath the station to reinitialize the life support system. This requires a combination of technical skills and hands-on labor -- while possibly keeping one or more of the creatures at bay.
The Supporting Cast
Below is the essential information about the four types of supporting cast members that play a part in this adventure: two unique characters, Birrden and Crowell; the group of surviving miners, all considered identical for the sake of simplicity; and the two moltenoids that have entered the station, both described with a single set of statistics. These characters are all controlled and portrayed by the Gamemaster. Feel free to expand upon their motivations and behavior as dictated by the way the adventure unfolds.
The numbers in parentheses following a character's Ability Scores represent resistance modifiers (which were explained in the Player's Fast-Play Rules). In the list of skills each character possesses, the number in parentheses following a skill is the character's skill score-the dice result needed to achieve an Ordinary success. If a character has a specialty skill, the skill score refers to the use of that specialty, not to the broad skill. If a character has more than one rank in a specialty skill, the rank number is given after the skill name(brawl 2, for instance).
The Supporting Cast
|
Security Chief Birrden
1st-Level Combat Spec
STR 13 (+1) DEX 9 (0) CON 10 (0)
INT 8 (0) WIL 8 (0) PER 6 (-1)
Durability (s/w/m): 10/10/5
Action Check: 9+/8/4/2 # Actions: 2
Attacks:
Brawl 15/7/3 d4s/d4+1s/d4+2s
Pistol 11/5/2 d6+2s/d8+2s/d8+4s
Defenses:
Battle vest d6-1 (LI)/d6 (HI)/d4-1 (En)
Dodge Successful skill check (10 or less) increases DEX or STR resistance modifier vs. next attack by +1/+2/+3.
Skills: Athletics (13); Unarmed Attack-brawl 2 (15); Acrobatics-dodge (10); Modern Ranged Weapons-pistol 2 (11); Vehicle Operation (9); Stamina (10); Knowledge-first aid (9); Awareness-perception 2 (10); Interaction (6).
Equipment: Security card (opens all doors except the closet in area 6 and the airlocks leading into areas 7, 8, and 9), stutter pistol, battle vest, comm gear (communication device).
Roleplaying: Birrden takes her role as chief of security seriously. The current situation, while beyond her control, makes her feel as though she has failed those who placed their trust in her. Still, until death overcomes them all, she will work to protect the station and its inhabitants. After getting over her initial confusion, she will embrace the heroes as the best hope the station has-and she will do everything in her power to make sure they use their skills to save Cauldron Station.
|
|
Administrator Crowell
1st Level Diplomat
STR 8 (0) DEX 10 (0) CON 6 (-1)
INT 10 (0) WIL 11 (+1) PER 13 (+2)
Durability (s/w/m): 6/6/3
Action Check: 11+/10/5/2 # Actions: 2
Attacks:
Unarmed 8/4/2 d4s/d4+1s/d4+2s
Pistol 11/5/2 d4+2w/d6+2w/d4+1m
Defenses:
CF long coat d4+1 (LI)/d4+1 (HI)/d6-1 (En)
Skills: Athletics (8); Unarmed Attack (8); Modern Ranged Weapons-pistol (11); Vehicle Operation (10); Stamina (6); Business-corporate 2 (12); Knowledge (10); System Operation(10); Administration-bureaucracy 2 (13); Awareness-perception 2 (13); Interaction-bargain 2 (15); Leadership (13).
Equipment: Security card (opens all doors except the airlocks to areas 7, 8, and 9), 11mm charge pistol, CF long coat, comm gear (communication device).
Roleplaying: Crowell is a good administrator who got greedy. Now his greed could result in the death of Cauldron Station and its inhabitants. In the current situation, Crowell is a panicky man who isn't thinking clearly. It takes a strong will and a solid argument to get through his fear to reach the good leader beneath. Once that's done, he'll go along with the heroes-if he's shown that his actions will save the miners under his command.
|
|
Miners
Nonprofession Laborers
STR 9 (0) DEX 8 (0) CON 8 (0)
INT 9 (0) WIL 7 (0) PER 7 (0)
Durability (s/w/m): 8/8/4
Action Check: 9+/8/4/2 # Actions: 2
Attacks:
Brawl 10/5/2 d4s/d4+1s/d4+2s
Tool 11/5/2 d4+1s/d4w/d4+1w
Skills: Athletics-climb (10); Melee Weapons-bludgeon 2 (11); Unarmed Attack-brawl (10); Vehicle Operation (8); Stamina-endurance (9); Knowledge (9); System Operation (9); Awareness (7); Interaction (7).
Equipment: Mining gear, universal tool (can be used as a club), comm gear (communication device).
Roleplaying: Every miner has an individual outlook, but in general they're fearful and certain that death is near. All of them are loyal to Crowell. Some still trust Birrden, but many blame her for the current situation.
|
|
Moltenoids
STR 15 (+3) DEX 11 (+1) CON 16 (+3)
INT 6 (-1) WIL 6 (-1) PER 4 (-1)
Durability (s/w/m): 16/16/8
Action Check: 13+/12/6/3 # Actions: 2
Attacks:
Heat See below
Claw 17/8/4 d4+2w/d6+2w/d4m (LI)
Defenses:
Metallic hide d6 (LI)/d6-1 (HI)/d4-2 (En)
Dodge Successful skill check (13 or less) increases DEX or STR resistance modifier vs. next attack by +1/+2/+3.
Skills: Acrobatics-dodge 2 (13); Stealth-sneak (12); Movement (16); Stamina (16); Awareness-perception 3 (9).
Roleplaying: Moltenoids are four-legged creatures with smooth, metallic hides. Their bodies are roughly cylindrical, a little less than a meter in diameter. Two of them have entered the station accidentally, and most of the damage they've caused is due to their physiology- which is deadly to humans. One occupies the engineering center and protects it from intruders. The other one wants to reach the ore storage bay to acquire what Crowell is jealously guarding: cartons holding a liquid metal that Crowell calls fire gold. It has the properties of mercury, except it is goldcolored instead of silver. Crowell sees profit when he looks at the material, but the moltenoids see food-they need the stuff to survive. They aren't hungry enough to blindly attack, but they will be soon.
Anyone within 2 meters of a moltenoid could suffer energy damage from the intense heat that emanates from the creature. Whenever a character is within range of a moltenoid, have the character make a Stamina-endurance check to see how much damage he or she sustains. Critical Failure: d6+2w; Failure: d4+2w; Ordinary: d4+1w; Good: d6s; Amazing: No damage. A moltenoid only uses its claws to protect itself, or when trying to reach a food source. A character attacked with the claws also needs to check for heat damage.
|
The Station
Important locations within this wing of Cauldron Station are depicted in the map below. Refer to that map as you read the following information, so you can familiarize yourself with the environment. Don't show the map to your players, unless they succeed in obtaining it from a computer.
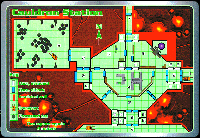
Cauldron Station is in bad shape. Since the power cut out, the temperature has risen to 39deg. C (102deg. F) and the air has grown stale. In six hours, the interior will heat to deadly temperatures and the atmosphere will turn toxic. If the power is restored before the six hours expire, the station can be saved. Until then, emergency lights barely illuminate the facility and the heat grows steadily worse.
Because of the poor environmental conditions, every hour characters must make a successful Stamina-endurance check to fend off fatigue. If a character fails the check or achieves a Critical Failure, he suffers 1 or 2 points of fatigue damage, respectively. Wearing an E-suit (see below) eliminates the need for such checks.
Airlocks must be opened manually, but no airlock can be opened if another airlock connected to the same area is already open. The airlocks to areas 7, 8, and 9 have been sealed. These seals can be removed with the proper tools and an hour of work. (Area 8 is the only one of these places that the characters should want to gain access to, and there's another easier way to get in; see the description below. )
Conduits containing wiring, vents, and other machinery run beneath the floors of the station and inside the insulated walls. The moltenoids use these conduits to travel throughout the wing shown on the map. Note that no conduits run beneath the mining dome (area 9) or the storage bay (area 8). Only the insulated wall provides secret access to these areas. Characters can enter the conduits, but they can't travel through them as easily as the moltenoids can.
Most computer stations in the facility are inoperative due to the power outage. Only computers in the operations center (area 4) and the engineering center (area 6) can be used, thanks to emergency power supplies in these rooms. Birrden, Crowell, or an operating computer can tell the heroes about the state of the facility and the impending time limit.
- Area 1: This access tunnel leads from the landing pads, where the heroes have docked their starship. A transport carries them from the pads to the airlock, which must be opened manually.
- Area 2: These four airlock chambers protect the wing from possible environment breaches.
- Area 3: This transport tunnel allows the vehicles to service the storage bay, the mining dome, and the landing pads.
- Area 4: Base operations serves as the command center of the station. Using the Computer Science skill, heroes can learn the current condition of the station (Ordinary success), call up the schematics for repairing the power generator and reinitializing the life support system (Good success), or access details about the mining operation, inventory, and a map of the station (Amazing success).
- Area 5: This medical center contains various medical supplies, including six trauma packs. Using a trauma pack provides a -2 bonus on any Knowledge-first aid skill check, or a -3 bonus on any Medical Science skill check for the purpose of healing damage. Each trauma pack can be used six times before its contents become depleted.
- Area 6: The engineering center contains the station's power generator, control computers, and access to the life support system located in the conduits beneath this room. One moltenoid has set up a lair in this area by melting a hole into the wall to the north of the power generator.
- Area 7: The airlock leading into this area has been sealed to protect the living quarters of the station from the creatures currently loose in the mining wing.
- Area 8: The ore storage bay contains both raw and processed ore. There are no conduits beneath the floor of this area. Crowell and six miners have commandeered this area, sealing the airlock and fending off frequent attacks by the moltenoids. Cartons of what Crowell calls"fire gold," mined from the same shaft the creatures emerged from, lure the moltenoids, since the material is food they need to survive. A melted hole in the insulated wall, to the south of the airlock, is the route the creatures use to reach the stored cartons.
- Area 9: The mining dome provides laborers with protection from the hostile environment. Shafts and mining equipment are located throughout the dome. The heroes should not be concerned with entering this area, unless they manage to come up with a way to herd the moltenoids back into the shaft they emerged from.
- Emergency Closets: Marked "E"on the map, each of these cabinets when fully equipped contains four E-suits, two trauma packs, and other emergency supplies. The closet within area 6 also contains components needed to repair the power generator. This closet can only be opened by using Birrden's or Crowell's security card. The contents of many of the closets may have already been used, at your discretion.
An E-suit protects its wearer from the adverse effects of the harsh environment inside the station, providing an air supply and insulation from the heat. Characters wearing E-suits don't need to check for fatigue from the heat inside the station. If a character wearing an E-suit suffers wound or mortal damage from an attack, the suit loses its ability to protect its wearer from heat.
Trigger Scene
When the heroes enter area 2 on the east side of the map to begin the adventure, read the following to the players:
It's uncomfortably hot and the air has a stale smell to it even after the airlock cycles closed. Emergency lighting provides the only source of illumination. Four closets line the chamber, and a second airlock leads into the station. No one has arrived to greet you, and the place has an abandoned, dead feel to it.
Birrden and three miners who have been deputized into a security detail wait in ambush in two of the closets, one on each side of the chamber. They are wearing E-suits. Have the heroes make action checks to start the scene. They receive a +1 step penalty because of the ambush. Make one action check for the entire security detail, using Birrden's action check score. The scene plays out in rounds, as described in the Player's Fast-Play Rules.
Birrden believes that the heroes are pirates or smugglers infiltrating the station. She has ordered the miners to help her subdue the invaders, using their club-like tools while she wields her stutter pistol. After a round of combat, the heroes can convince her to stop fighting-if they put down their weapons and surrender. Otherwise, Birrden fights until she is defeated. The miners surrender as soon as Birrden falls.
The trigger scene ends with the heroes defeating or teaming up with Birrden, or with them being captured by the security detail. If captured, they can later explain who they are and will then be recruited to help save the station.
Encounter Scene
Birrden eventually explains that Administrator Crowell and a handful of miners have barricaded themselves inside the ore storage bay. She'd like the heroes to talk to Crowell and get him to come out of hiding and help. They need his security card to open the closet in area 6. This closet contains the components necessary to repair the power generator. Crowell also knows where components are stored that can be used to repair the heroes' ship.
If Birrden or any of her security detail aren't available to provide this information, the heroes will have to stumble upon the locked bay on their own. The airlock leading to area 6 shows signs of extreme damage-the alloy has been melted and scarred by what seem to be claw marks, but the material appears to have been too tough to get through. The wall to the north of the airlock is another matter. A passage has been melted into the insulated wall, and something very hot has apparently moved through the conduit. Melted wires, scorched pipes, and other signs of intense heat mark the passage.
The heroes can meet up with Crowell in one of three ways. If Birrden convinces them to seek out Crowell, she gives them the frequency of his comm gear. They can talk to him via the comm device. If not, they can try to get his attention by banging on the airlock, or they can use the conduit tunnel to enter the bay.
Crowell has an 11mm charge pistol that he isn't afraid to fire. He's used it against the creatures, and he'll use it on the heroes if they don't calm him down and earn his trust. He's paranoid, jealously protective of the fire gold, and unwilling to part with components to fix the heroes' ship.
The heroes can bargain with Crowell, or they can bluff him into assisting them. During negotiations, the heroes must accumulate six successes through their chosen form of interaction to win Crowell's trust. (Each time a character attempts a bargain or bluff skill check, an Ordinary result counts as one success, a Good result as two, and an Amazing result as three successes. ) Combine dice rolls with roleplaying when running this scene.
Or, they can simply decide to overpower Crowell and his band. Each miner has a club-like tool to use in his or her defense. By the end of this scene, the heroes should accomplish the following things:
- Learn that the moltenoids are attracted to the fire gold. (A large portion of the liquid metal is missing from a broken carton, because a moltenoid consumed it. )
- Obtain Crowell's security card that opens the closet in area 6.
- Secure Crowell's promise that spare parts will be supplied to repair their ship. (He won't turn these over until the station has been made safe. )
Combat Scene
The primary combat scene occurs in the engineering room (area 6), where one of the moltenoids has established a lair. The heroes can lure the creature into the open with fire gold; they can use fire gold to set a trap; or they can simply enter the chamber with weapons blazing.
The creature's lair is a burrow that has been melted into the thick insulated wall that surrounds the station's power generator. The intense heat has damaged vital components within the generator that must be replaced before power can be brought back on line. If the heroes don't lure the moltenoid out in some way, they'll have to enter the burrow to battle the creature. A short, meter-wide tunnel opens into a two-by-four-meter chamber carved in the insulated wall to the north of the generator. The beast fights to defend itself and its lair, using its sharp claws and the intense heat of its body.
The second creature can be used to create suspense and build terror. It can emerge from the dark station corridors or arise from within the melted-out walls to hound, harry, and attack the heroes. Or, they can decide to hunt down the creature, dispensing with it before trying to restore power to the station. If neither of these events occurs, then the creature appears during the challenge scene -- adding an element of combat for some of the heroes to deal with while the others work to fix the life support system.
Challenge Scene
In the end, this is the most important scene of the adventure. To save the miners (those still in this wing as well as those barricaded in the living section), the heroes must restore power and reinitialize the life support system. If they have obtained the parts stored in the closet in area 6, and managed to call up schematic diagrams on one of the operational computers, the heroes can repair the generator. This requires the Technical Science skill. If a hero is using the juryrig specialty or just the broad skill, he or she must achieve eight successes. If the repair specialty is used, the number of successes needed is reduced to six. (See "Encounter Scene" above for how to count up accumulated successes. )
When the proper number of successes has been achieved, the air vents hiss and the lights come back on. The temperature begins to drop slowly. The station is saved.
Aftermath
In the length of time it has taken them to set things right at the station, the heroes have turned from intruders into celebrities. They are provided with all the parts they need to fix their ship, and they may go on their way soon thereafter.
Or, perhaps your group story still has tales to be told. If you and your players are having fun and you want to extend the adventure at Cauldron Station, keep on playing and see what happens!